Vulcan is a browser-based workspace for creating, checking, simulating, and submitting Home Energy Model (HEM) inputs.
It is designed for assessors, consultants, housebuilders, and others who need a faster and more reliable workflow than long-form manual data entry permits.
Users can create or import dwelling geometry, combine it with defaults, validate inputs, and prepare compliance submissions to ECaaS.
Vulcan also supports wider analysis beyond compliance, including multiple zones, local climate, custom fabric, and system assumptions. This makes it useful for design and scenario modelling, not just compliance.
Vulcan's goal is to make HEM practical, faster, and more useful to work with.
How Vulcan works
Vulcan separates a model into three distinct layers.
1. Geometry file
This is the plot-specific description of the dwelling geometry and any element-level changes made in the drawing interface.
It is saved in CSV format so it can be reviewed, edited, and integrated with spreadsheet-based workflows where needed.
2. Defaults file
This is a HEM JSON format file that provides the wider assumptions and inputs used to build a complete model: schedules, systems, fabric assumptions, and other required data.
3. Base model
When a geometry file is saved, Vulcan merges the geometry with the defaults file to create a HEM JSON input file.
Calculations and scenarios
That merged HEM input can then be:
- submitted to ECaaS for compliance calculations
- used in local scenario analysis
- combined with alternative parameters such as systems, weather, or fabric changes
This separation is one of the main differences between Vulcan and more monolithic form-based workflows. It helps standardise what should stay consistent across many dwellings, while keeping plot-specific inputs auditable and easy to edit.
First time guide
This is the fastest way to understand the basic Vulcan workflow.
By the end of this guide, you should have created a dwelling model, submitted or prepared your first ECaaS calculation, run a HEM simulation locally, and viewed the results.
Before you start
You will need:
- a Chromium-based browser with File System Access support, such as Chrome or Edge
- a local folder that can act as your Vulcan workspace
- dwelling information: floor plan, window dimensions, construction type, and systems. It is recommended to start with your own dwelling so you can easily fill gaps.
- optionally, a SAP worksheet or XML file to compare or validate against.
Most modelling files stay in your local workspace, giving you direct access to inputs, outputs, and supporting files. When you sync a Calculate draft, request review, or submit to ECaaS, Vulcan stores selected saved inputs and evidence in the cloud for submission, review, restoration, and scheme requirements.
While Vulcan supports data restoration for assessments we store, we strongly recommend users secure their device and back-up their workspace to reduce the risk of data loss.
Step 1: Log in and choose a workspace
When you open Vulcan, you will be prompted to select a local folder to be your workspace.
Your workspace is where Vulcan stores geometry files, merged HEM inputs, scenario configs, output files, logs, tariffs, and anything you upload to support modelling (overlays, SAP files).
If you are starting for the first time, install or restore the sample parameter library so the standard example files are available. For more detail, see Setting up Vulcan Software.
The sample library also installs example files that can help you test the workflow before using your own dwelling. Existing base model files in your workspace are preserved when the library is restored.
Step 2: Create a new dwelling file
Navigate to the Geometry page and create a new model.
Rename it to something distinctive and searchable. Vulcan saves the visual geometry data separately from the wider defaults used to build a complete HEM input.
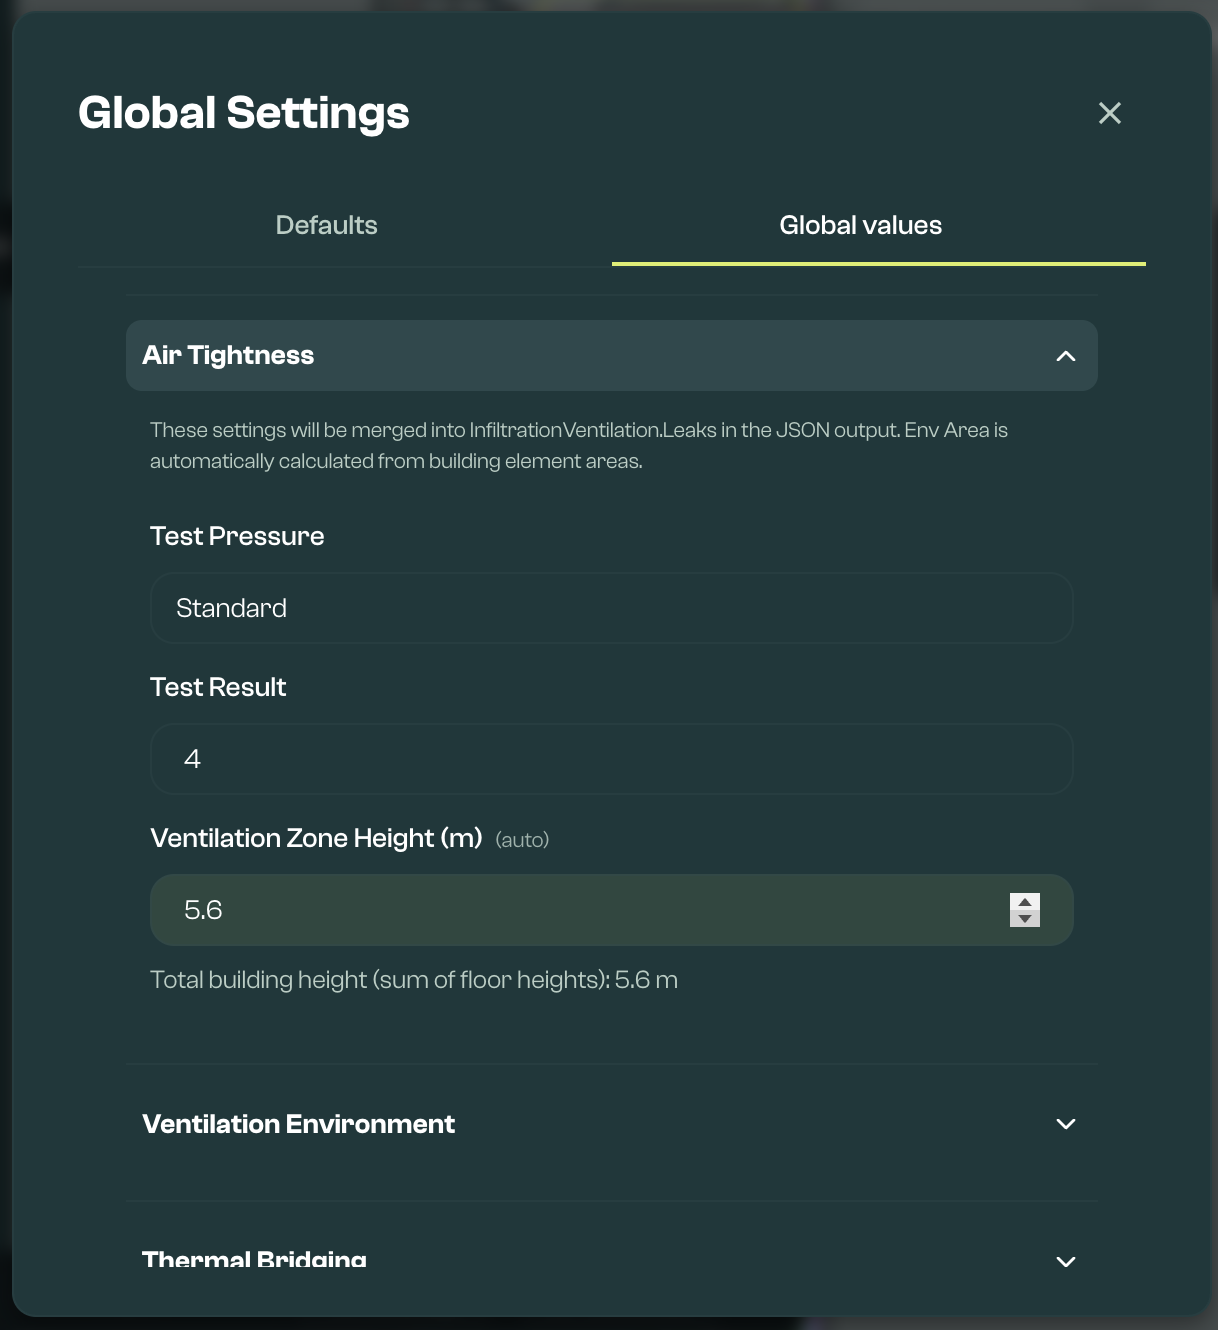
Step 3: Set global defaults
Open Global Settings from the File menu and confirm the defaults file and model-wide settings.
Typical checks include:
- defaults file, which can be adjusted to fit the thermal properties of the dwelling. An example file is provided as part of the Sample Parameter Library.
- FHS validation, which is required for the main compliance workflow. This keeps the model aligned to the fields accepted by the HEM:FHS wrapper.
- heating type and related compliance assumptions
- airtightness and ventilation settings
- location properties such as wind exposure and altitude
- default assemblies for newly drawn walls, roofs, and ground floors
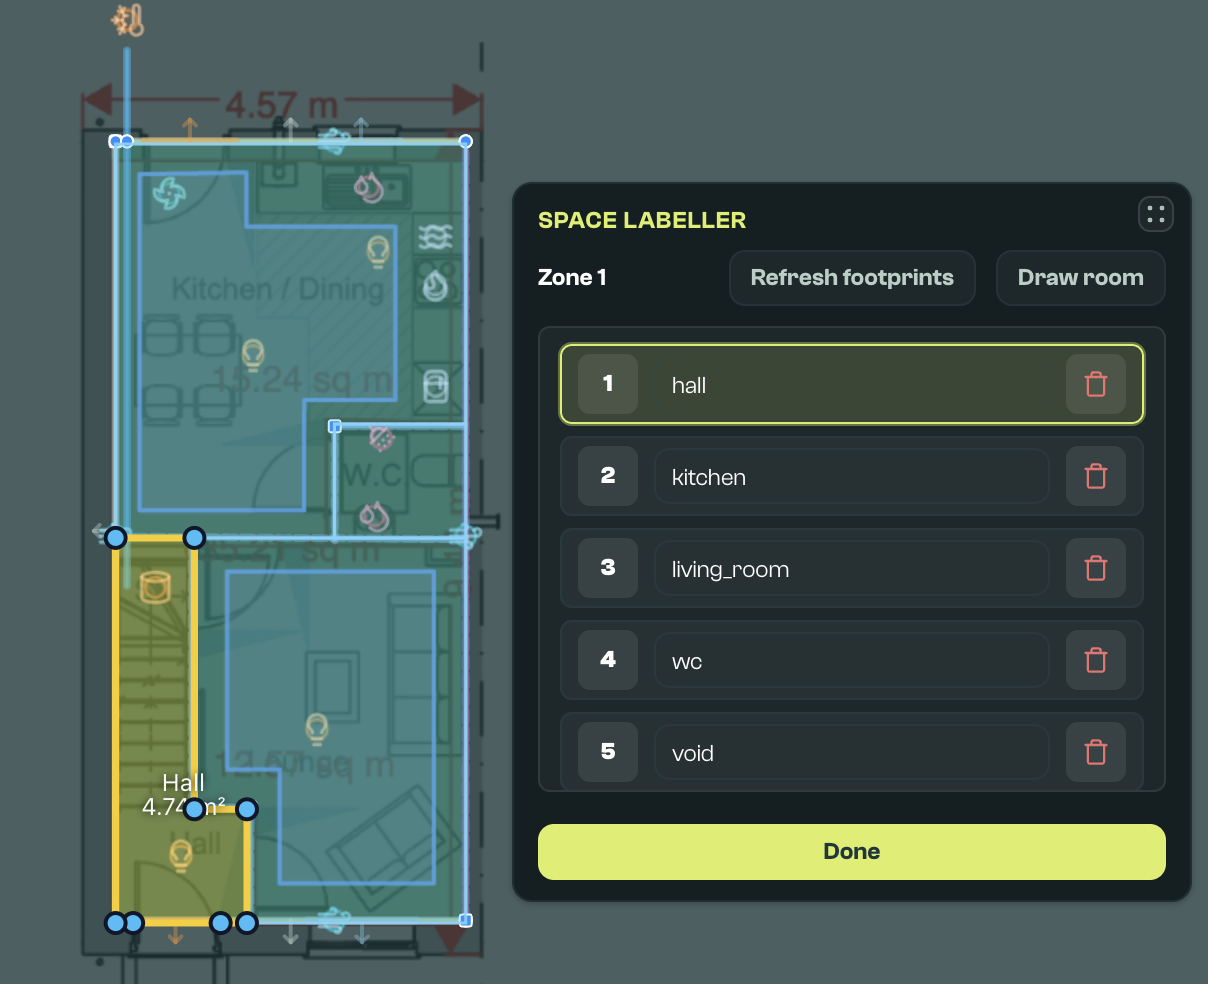
Room counts such as bedrooms, wet rooms, hot-tapped rooms, and living area should come from Space Labeller once room footprints are labelled. Use Space Labeller for these values in a normal first model.
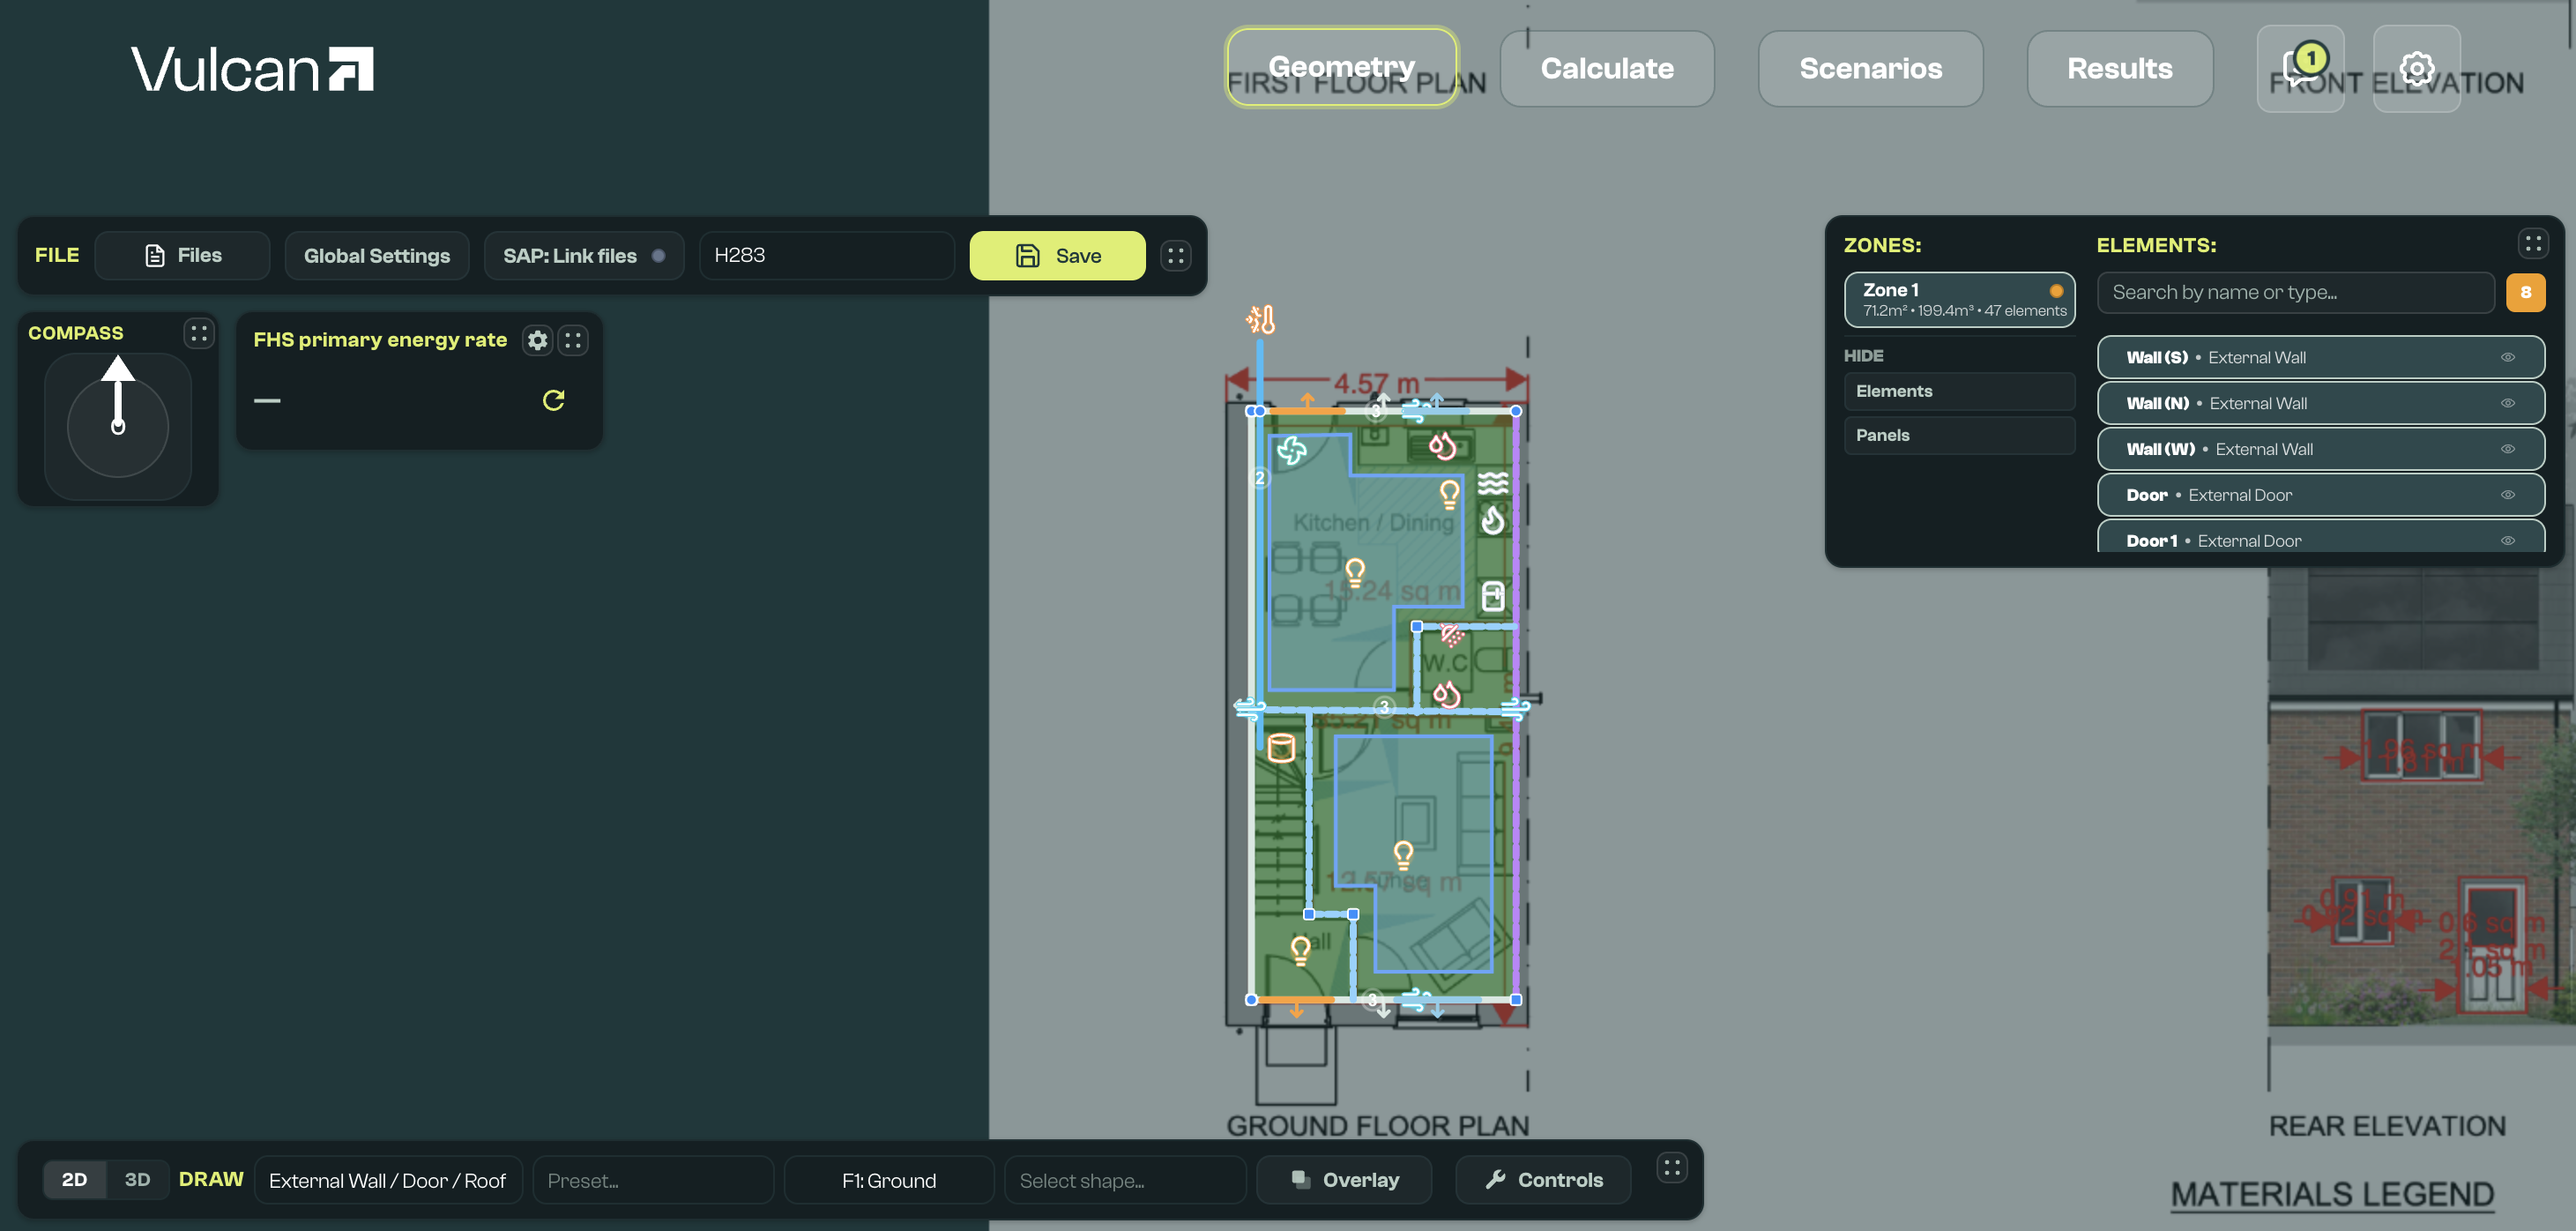
Step 4: Draw or import the dwelling geometry
Adjust the north offset so the main walls align with the canvas snap angle. Canvas drawing snaps by default to right angles and nearby elements, so a suitable offset can make input creation easier.
You can also add an image overlay (such as a floorplan) and trace over it, or import files from CAD tools such as SketchUp and Revit (in IFC4 format) where appropriate.
Then use the drawing tools to create the dwelling shape and elements.
Most first models only need:
- the envelope: external walls, windows, doors, floors, roofs, and any relevant adjacent walls
- required system inputs: heating source, distribution, hot water, and lighting
- thermal bridging, which can use a simplified zone-level assumption for a first model
If you have drawn closed rooms or spaces, use Space Labeller to assign room types. Space labels help Vulcan set room counts for compliance purposes, as well as the living/rest-of-dwelling split.
For a first model, focus on getting the core envelope, key systems, and validation right. Additional details (shading, further systems, leaks and individual thermal bridges) can be layered in once the basic workflow is working and you build confidence.
For detailed drawing controls, see the Geometry Section Guide.
Step 5: Review and edit elements
As elements are drawn, they can be selected individually or as a group, edited, and validated.
Use the editor and viewer panels to:
- update elements and their properties, individually or in bulk
- move elements between floors
- review warnings and critical validation issues
- inspect differences against SAP data if SAP inputs have been uploaded
You can switch between 2D mode and 3D mode. Use 2D mode for drawing. Use 3D mode to visually check elevation and, where available, select, multi-select, and frame existing elements while reviewing the model.
Ventilation and thermal bridge warnings may appear during validation. Review them before preparing a calculation.
Where needed, you can request a Vulcan review before submission. Reviews are based on the evidence provided, including overlay and SAP files.
Step 6: Save the model
Saving writes the geometry into a CSV file and attempts to create the merged HEM JSON input.
Save status and build status are separate. If the geometry CSV is saved but the merged HEM JSON cannot be created, Vulcan will show a build error to fix. In that case, the drawing itself has still been saved.
After the model has saved, Quick solve can be used for a first preview of headline results where available.
Step 7: Prepare a calculation
Go to the Calculate section of the app. This part of the app is used to create ECaaS submissions.
Create a new submission, and add the input file you created. You can add multiple input files for each submission, and link each input file to multiple plots.
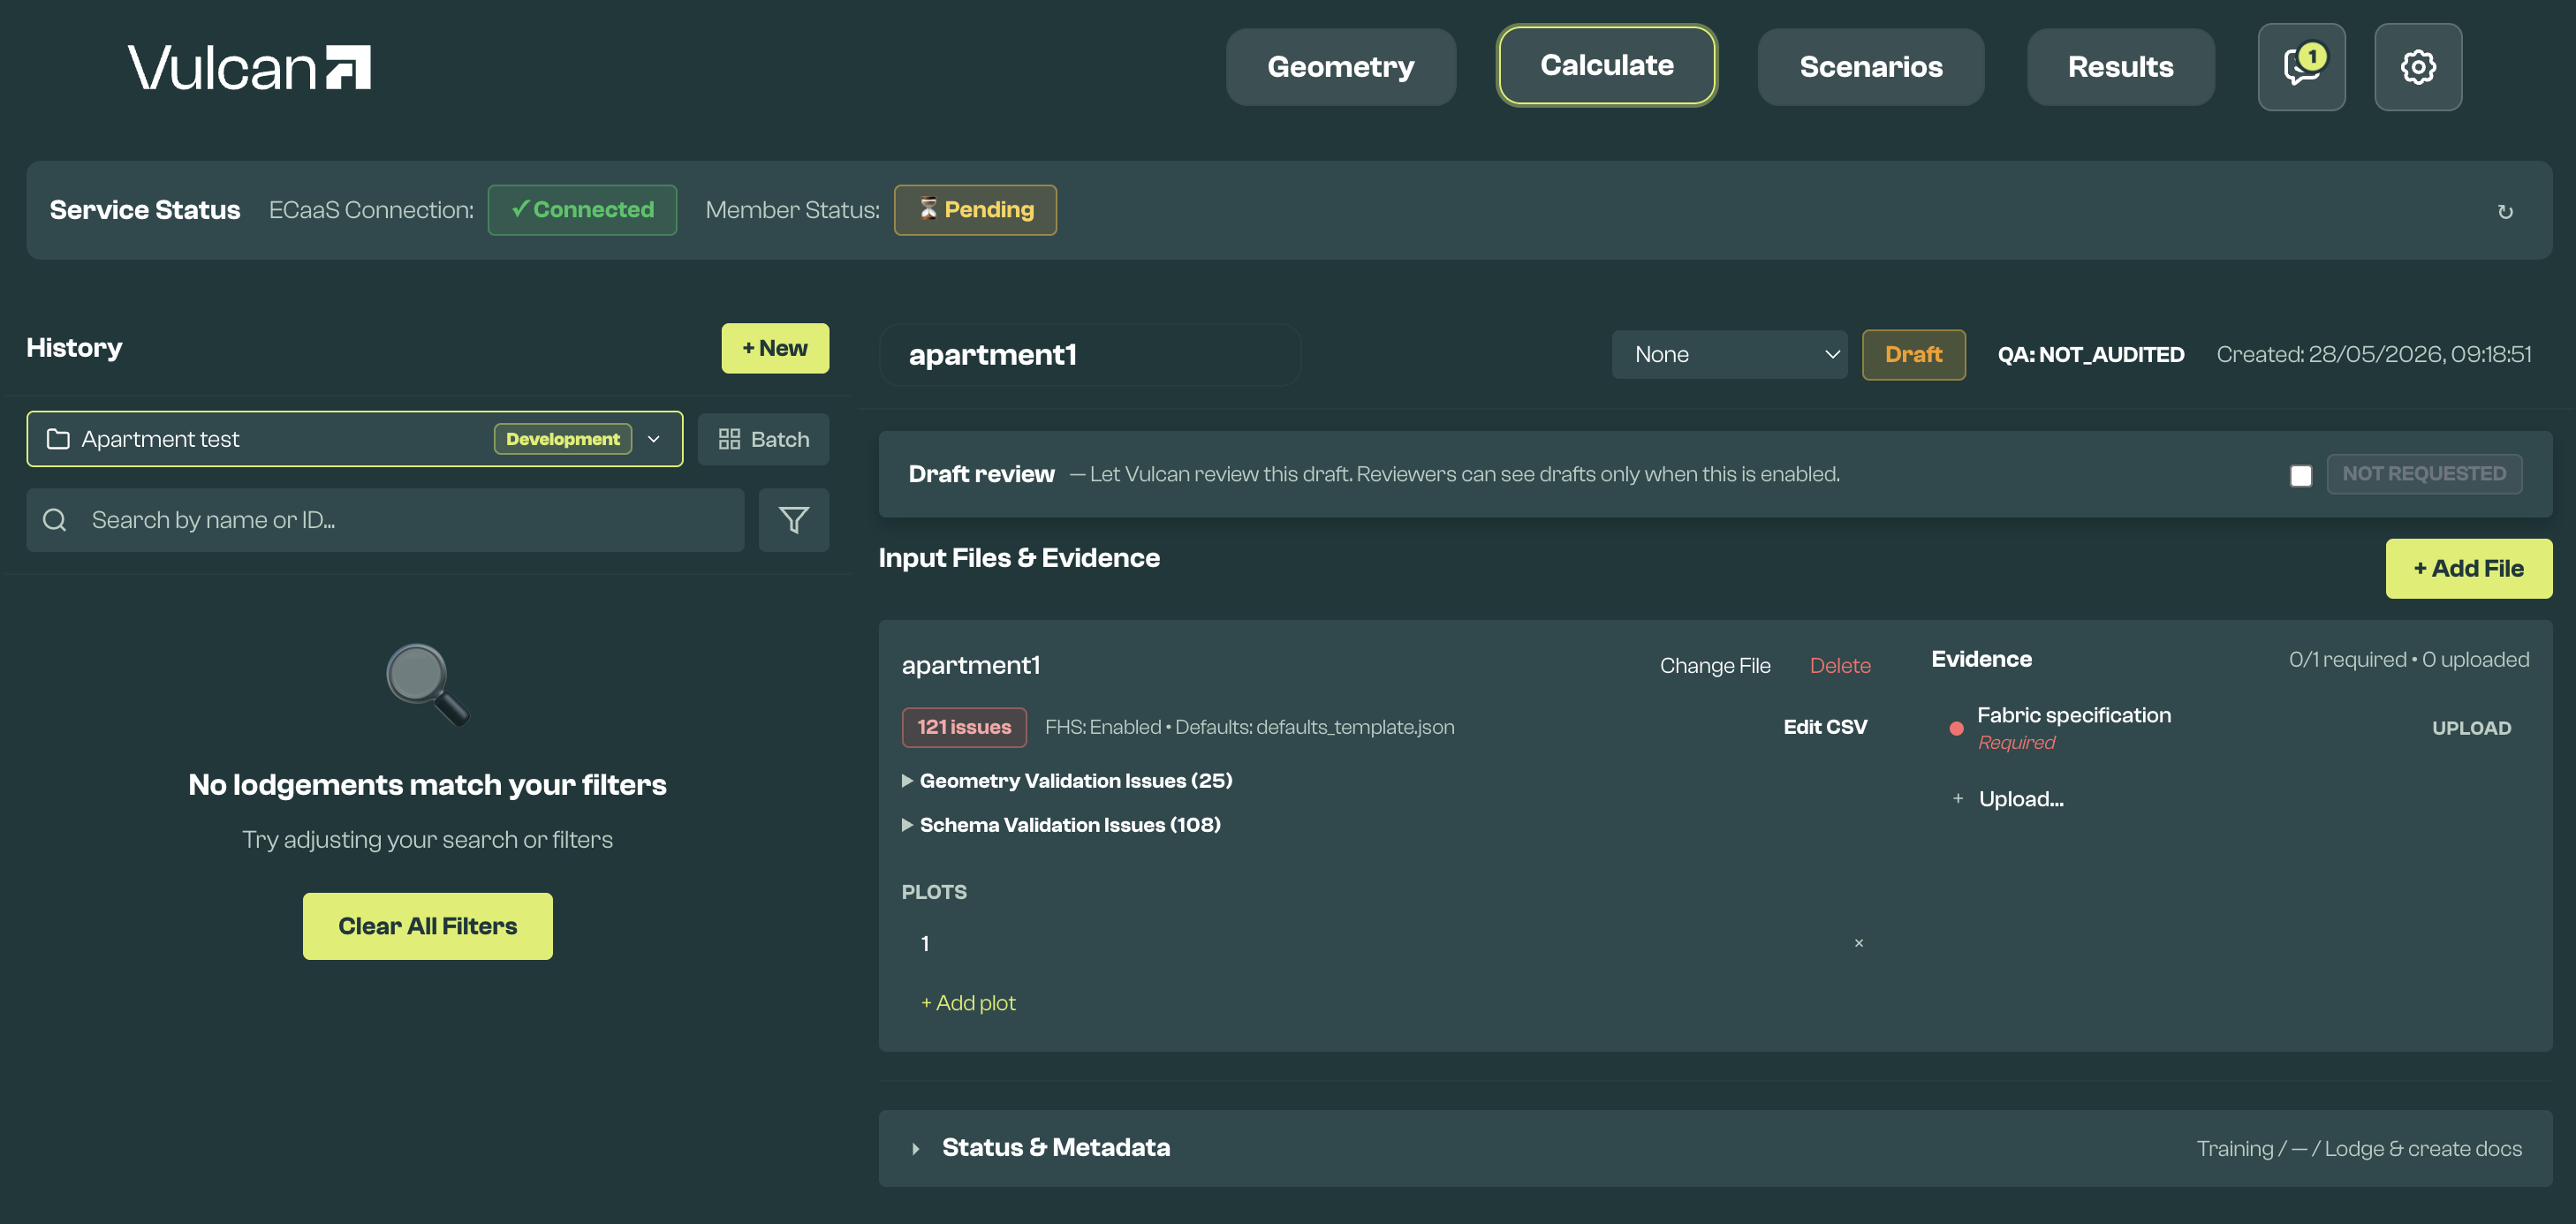
Attach the evidence needed to support the submission. This may include plans, specifications, overlays, SAP files, or element-specific evidence, such as airtightness tests or photographs.
Set the purpose of the submission. Users who are not yet Vulcan OCDEA Members can select Training.
For more detail on drafts, evidence, reviews, and ECaaS submission status, see the Calculate Section Guide.
Step 8: Submit to ECaaS
When ready, submit the assessment to ECaaS. ECaaS ('Energy Calculations as a Service') is the official HEM calculation service used for compliance submissions.
Once submitted, Vulcan will show the ECaaS response, submission status, and headline metrics when they become available.
You will not be able to edit an assessment once submitted, but you will be able to create a new submission based on an existing one.
Step 9: Create scenarios
If you want to analyse design changes beyond compliance, use the Scenarios section of the app.
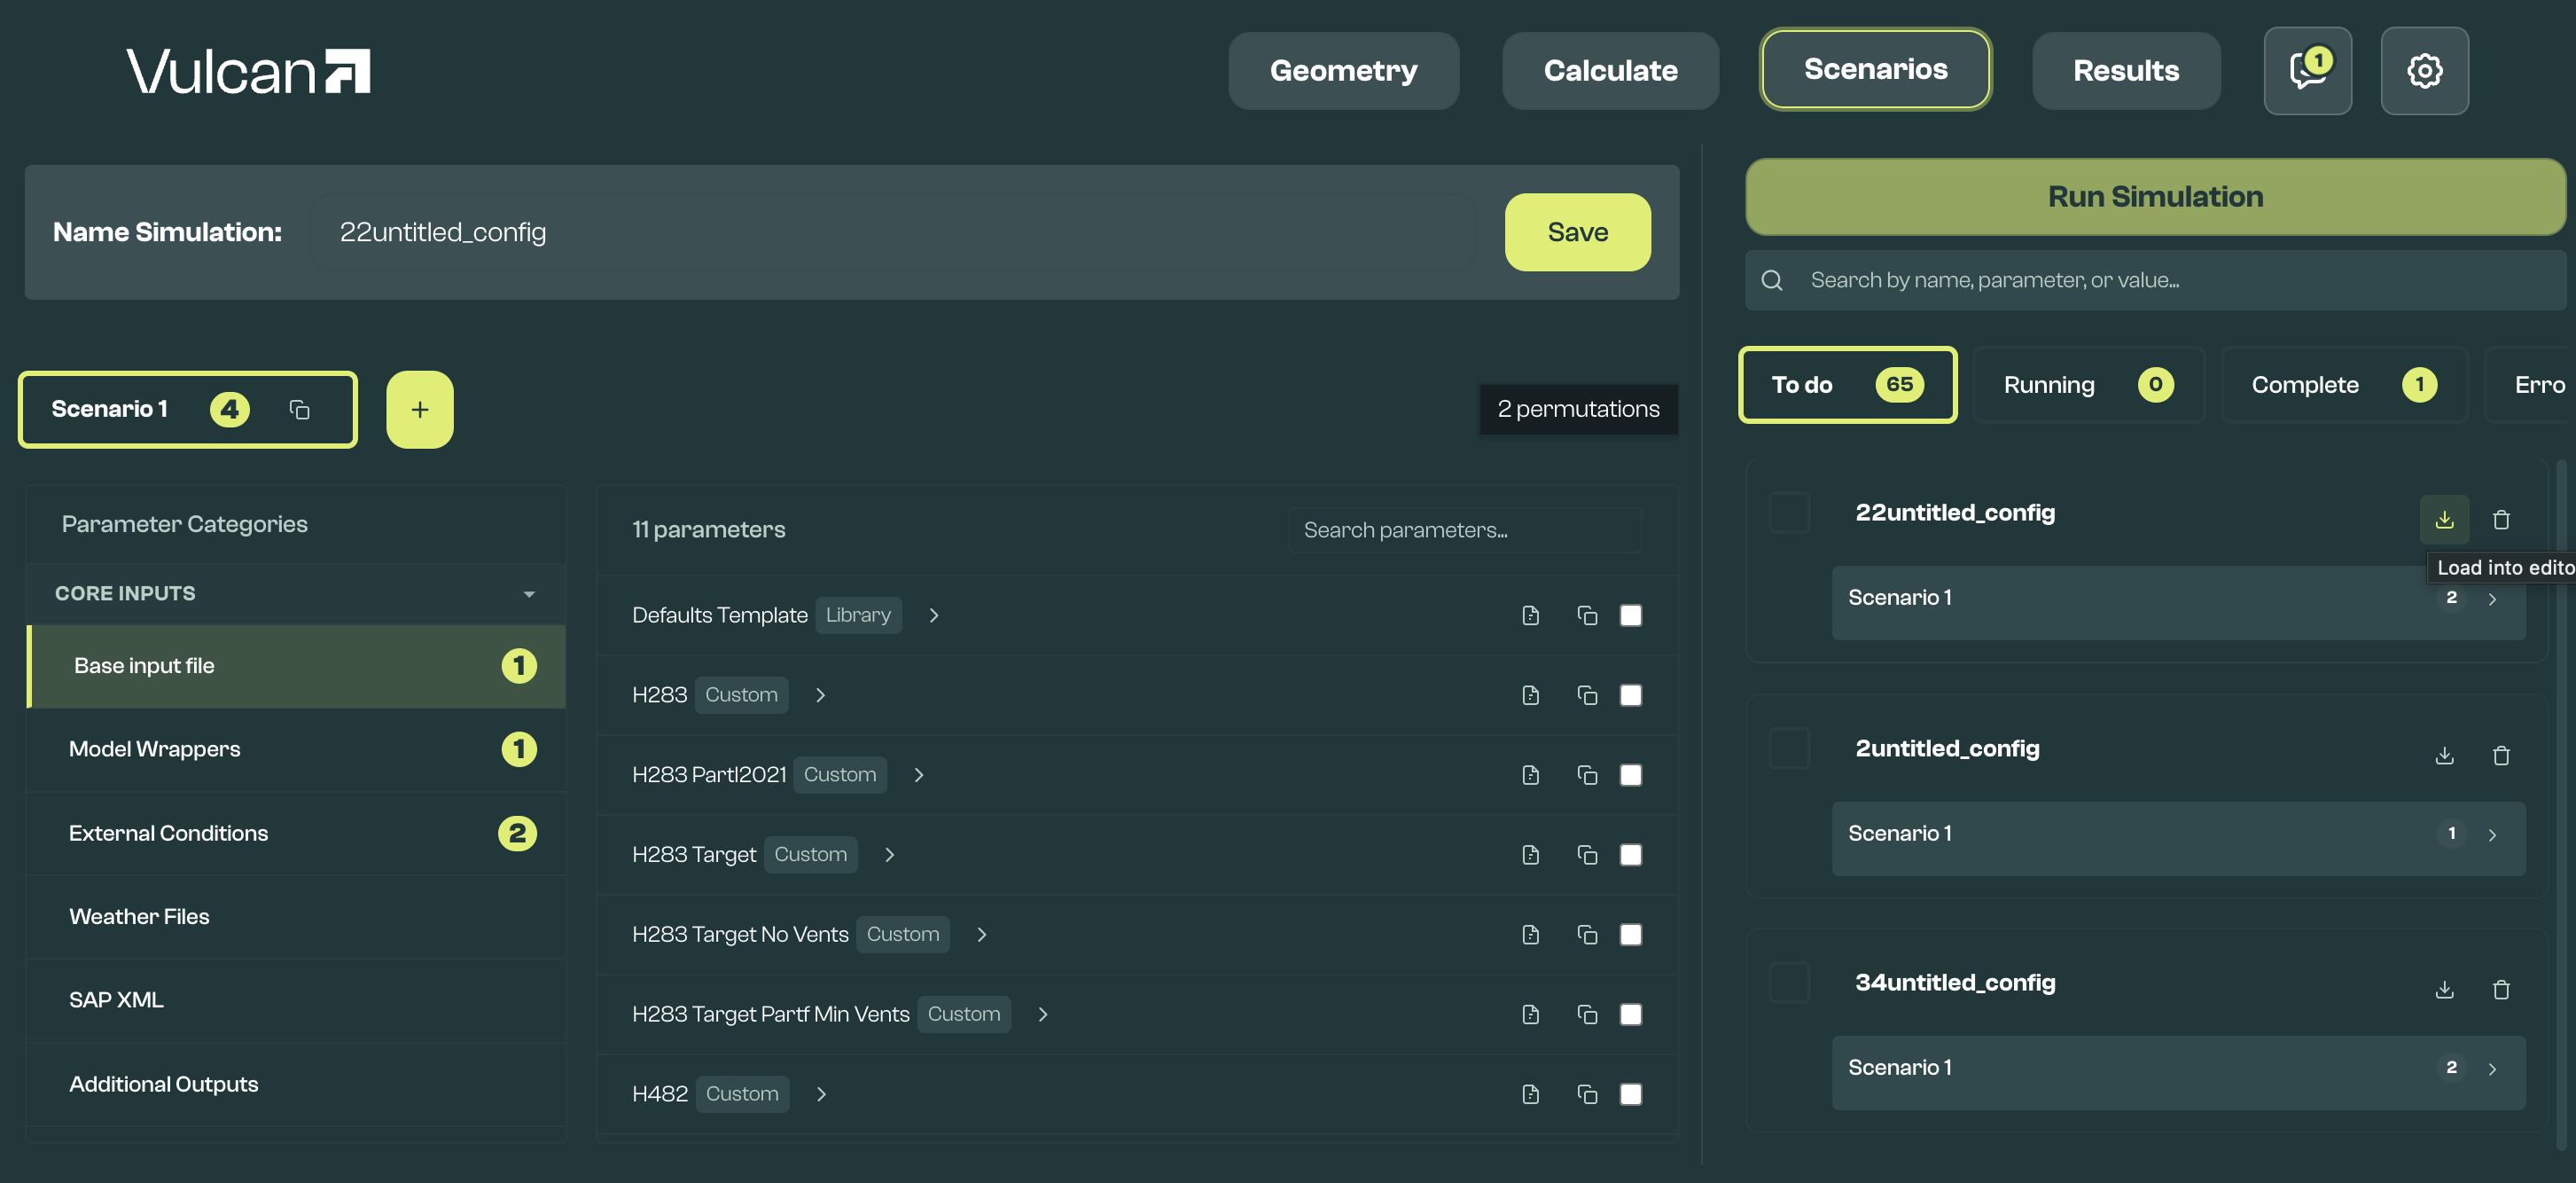
Here you can define simulation configurations that, for example:
- test how variations in fabric, systems, orientation and more impact compliance or performance
- run a Core simulation using FHS assumptions, to get detailed half-hourly data instead of just summary metrics, and better understand compliance results
- test non-compliance scenarios to understand how the dwelling might perform in practice, including alternative loads, system assumptions, or local weather conditions
Once you are ready, click Run Simulation. Simulations run on your device, meaning you can run as many as your computer permits. All outputs are stored locally, so they are easy to access.
For more detail, see the Scenarios Section Guide.
Step 10: Compare results
Move to the Results section to review the outputs from simulations.
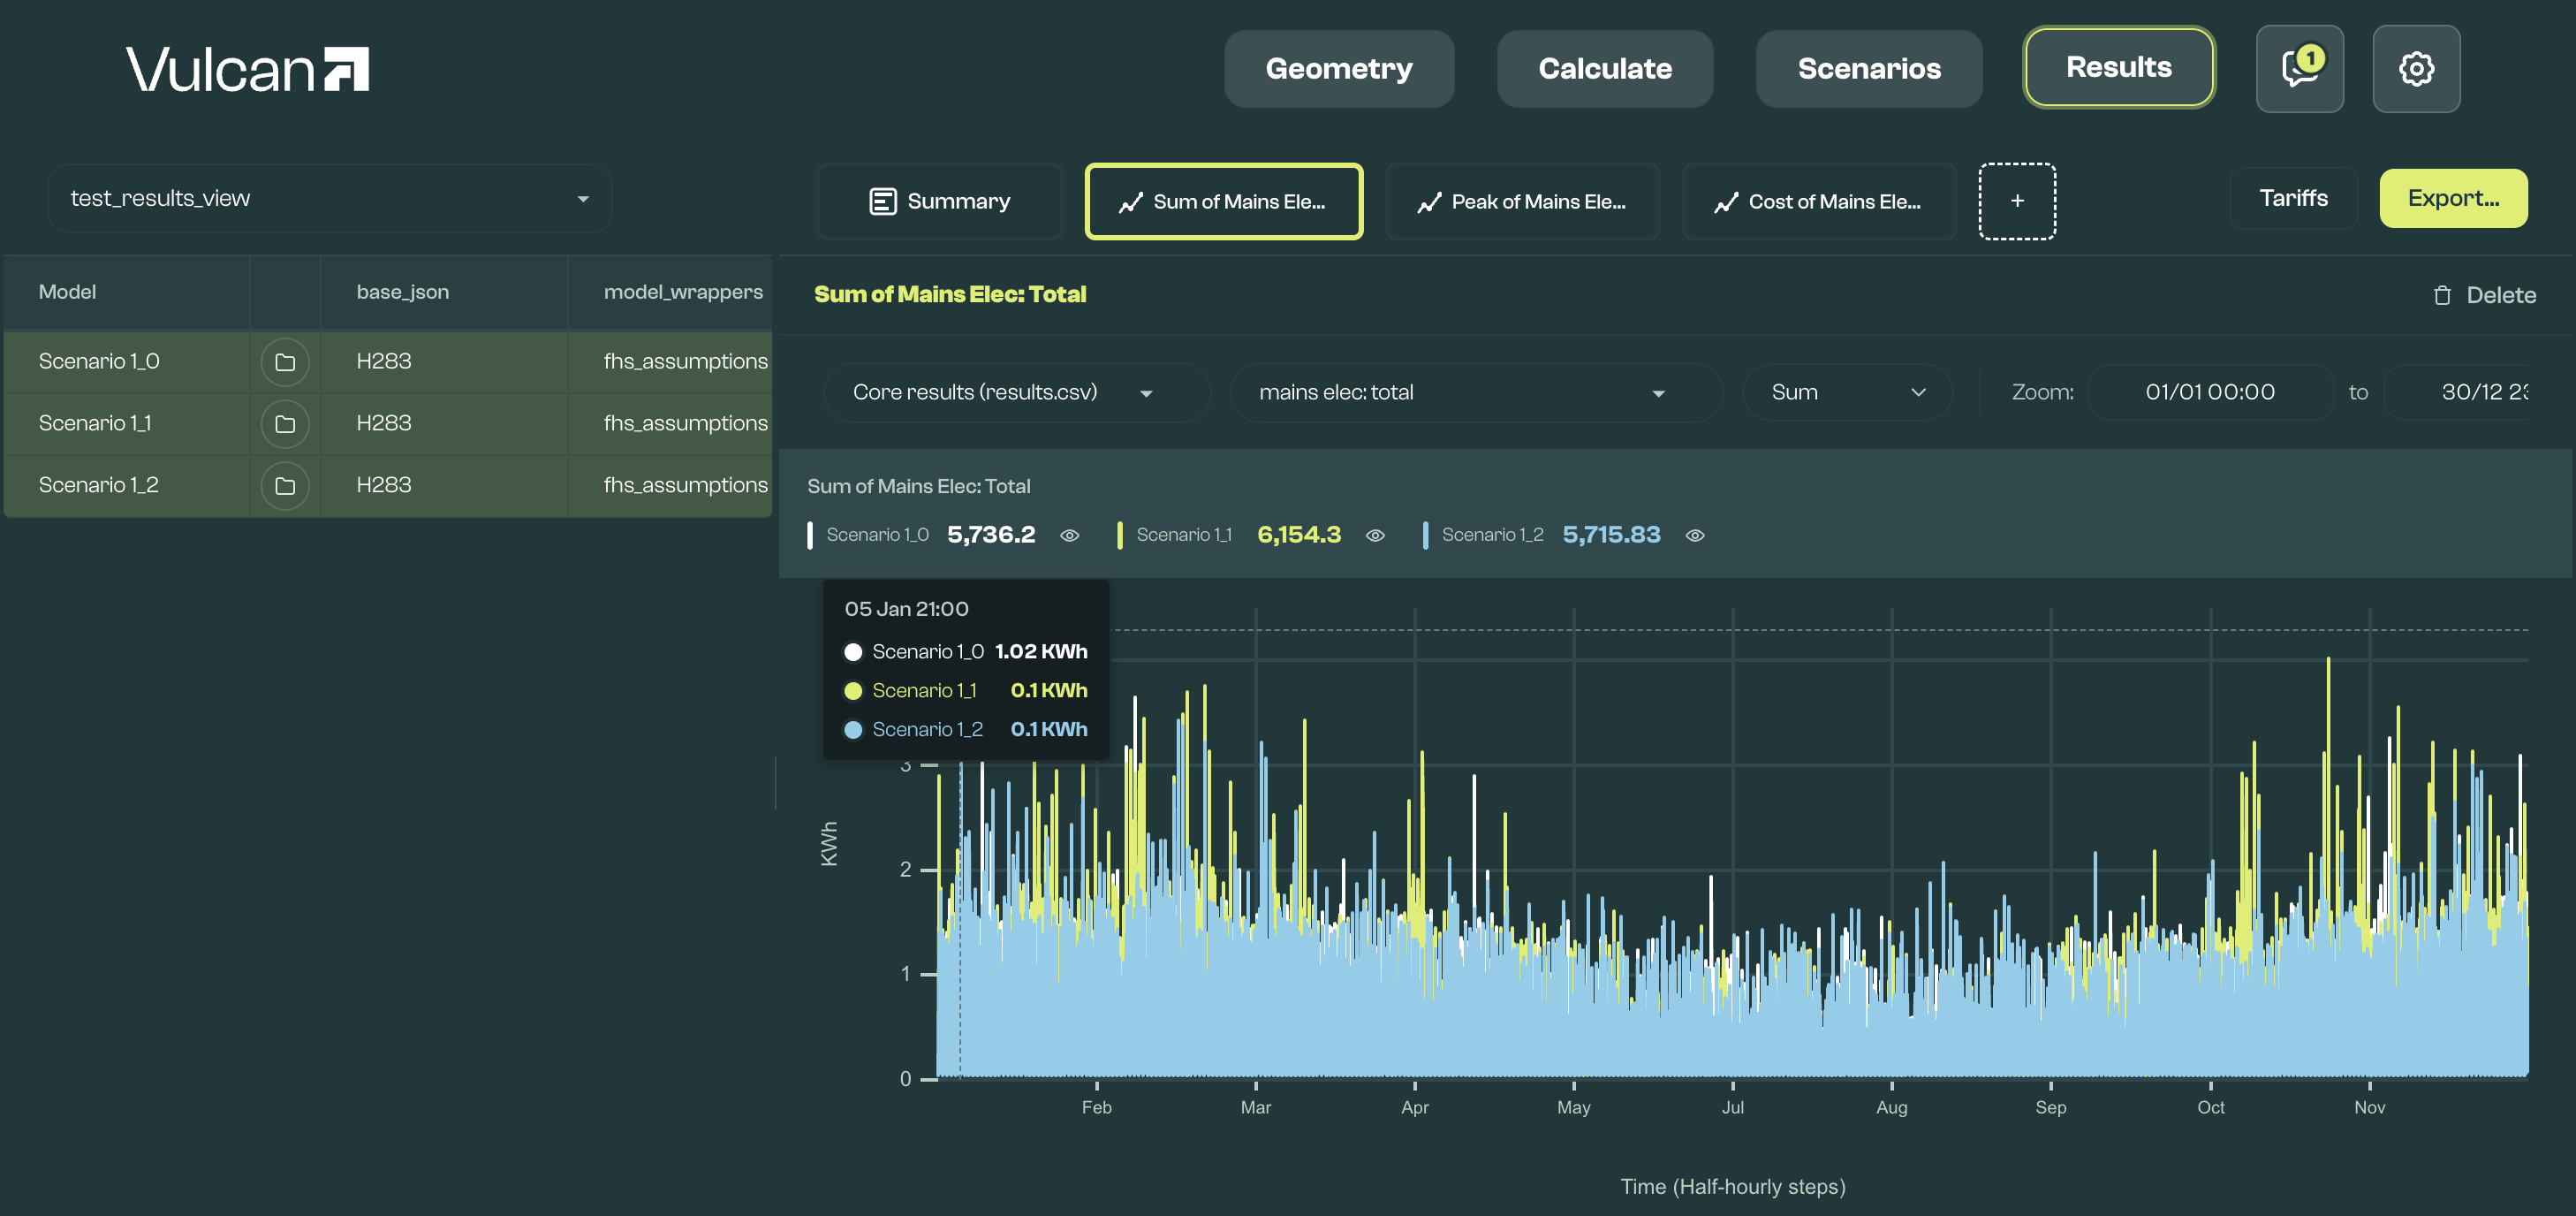
You can visualise metrics from simulation outputs as graphs, or as aggregate metrics. Metrics can be created by combining output columns, aggregation functions, and optional thresholds.
You can use metrics to evaluate, for example:
- the number of hours where unmet demand, or internal temperatures, exceed a threshold
- the consumption or demand for heating or cooling across different parts of the day or year
- the cost of consumption, based on variable tariffs
Tariffs can be added directly to the relevant folder in your workspace, or created using an interface. You can also export graphs and tables as CSV files.
For more detail, see the Results Section Guide.
Experimental functionality
Some Vulcan features remain experimental and should be used with care.
These currently include:
- SAP generation: Generate a SAP XML from the Scenarios workflow and optionally run it through the netzeroapis SAP engine. Outputs should be checked carefully before use.
- MCP server: Exposes selected Vulcan functions (creating inputs, running simulations, analysing results) to local scripts and AI tools such as Claude or Cursor for workflow automation.
- CAD software imports: Import IFC4 files from CAD tools using different import modes (elements, massing, negative space), with an audit file provided as part of the process.
These features can be useful for exploration and feedback, but outputs should be checked carefully before use.
What these public docs do not include
This page is intended as a public introduction and workflow guide.
More detailed reference material, member-specific processes, and other operational documentation remain available within Vulcan for active users.
You will find documentation on the Vulcan API, which can be used by third party software providers to integrate Vulcan's ECaaS submission and quality assurance flow, at https://api.usevulcan.app.
To access Vulcan H3 (HEM-HTC-Harness), an open source workflow to calibrate Home Energy Model simulations with real-world HTC measurements, speak to the Vulcan team.
Access and updates
If you want access to Vulcan, or want to hear about workflow updates, documentation improvements, and HEM-related product developments, register your interest through the website or join the mailing list.